Active Directory
One common skill I've heard and seen a lot about is Active Directory, which is basically how administrators manage access to resources. Since it seems like such an important skill to at least be familiar with in IT, I decided to try it out for myself in my home lab. For the lab I followed Josh Madakor's video on YouTube which can be found at this link https://www.youtube.com/watch?v=MHsI8hJmggI. The video is about three years old and Josh uses a Mac for the lab and I use Windows 10, therefore there are a few small differences between the video and my post, but nothing super significant. The lab involves downloading VirtualBox, Windows Server 2019, and Windows 10. Then using virtual machines (VMs) to set up the virtual server and using a script from Josh's video to create a large number of fake users. Finally, creating a Windows 10 machine and connecting to the server.
The first step is to download virtual box at this link, https://www.virtualbox.org/


Once installed, click on "all supported platforms" under VirtualBox 7.0.14 Oracle VM VirtualBox Extension Pack.

This will begin another download. When the download is finished, install it. It will give you a license agreement to agree to. (This can take a while)
Once that is done go to https://www.microsoft.com/en-

Next go to https://www.microsoft.com/en-

Set up the server first
Open Oracle virtual box and click new. Then name the server and select the image. Then ensure that it is the 64 bit version and the edition is one of the Desktop Experiences (I went with standard).
Open Oracle virtual box and click new. Then name the server and select the image. Then ensure that it is the 64 bit version and the edition is one of the Desktop Experiences (I went with standard).

Next assign the RAM. Default is 2048, which is what I went with. Then click next.


You should now see the new server in Oracle VirtualBox.
Before anything else, click on settings (yellow gear) and go to advanced, and change both Shared Clipboard and Drag'n'Drop to Bidirectional.

This makes it a little easier to switch between your host computer and the VM, and drag links or text between the two. (Josh Madakor changes his CPU cores to 4 under system, processor, but I did not want to change mine.)


Double click icon in files.


Next Click the network icon in bottom right and click network.

Right click on the first one and select status, then click details.
If it has an IP address that's 10. something, this is likely the adapter for your real home network.
Go through the same process to check the other adapter, it should say 169. something because it can't find DHCP.
Go through the same process to check the other adapter, it should say 169. something because it can't find DHCP.


Next, you want to rename your PC. Right click start menu, select system, and then select rename this PC.

Change the name as desired.
Next install active directory domain services. Go to the start menu and click on server manager.


Click add roles and features. Click next twice and you should see your server.

Make sure it's selected and click next. Then check active directory domain services and click next.

Click next through the two next pages and select install.

It will begin installing which takes a minute.
 Once that's done close out and go up to the top where it has a flag and a yellow ! mark for Post deployment configuration, click promote this server to a domain controller.


Then click next and enter a password then click next. Click next again through the next four pages, and click install.

It will then restart the VM automatically. You will see your name has changed to MYDOMAIN/Administrator. From there go ahead and log back in.
The next step is to set up an actual domain account instead of using admin all the time. This is usually a good practice in the real world, to use your admin account as little as possible.
Click on start, go to Windows Admin Tools, and then click on Active Directory Users and Computers.
You should see mydomain.com on the left, right click and scroll down to "New", under that select Organizational Unit, which is basically a folder for the server.

Name it whatever you want, I went with Admins.


Under member of click add, then type in domain admins and click check names.


In server manager, click add roles and features. Click next through the next three pages ensuring that it is the right server, then check remote access and hit next.


Click next until the option of install appears and click install. This will start and installation process.


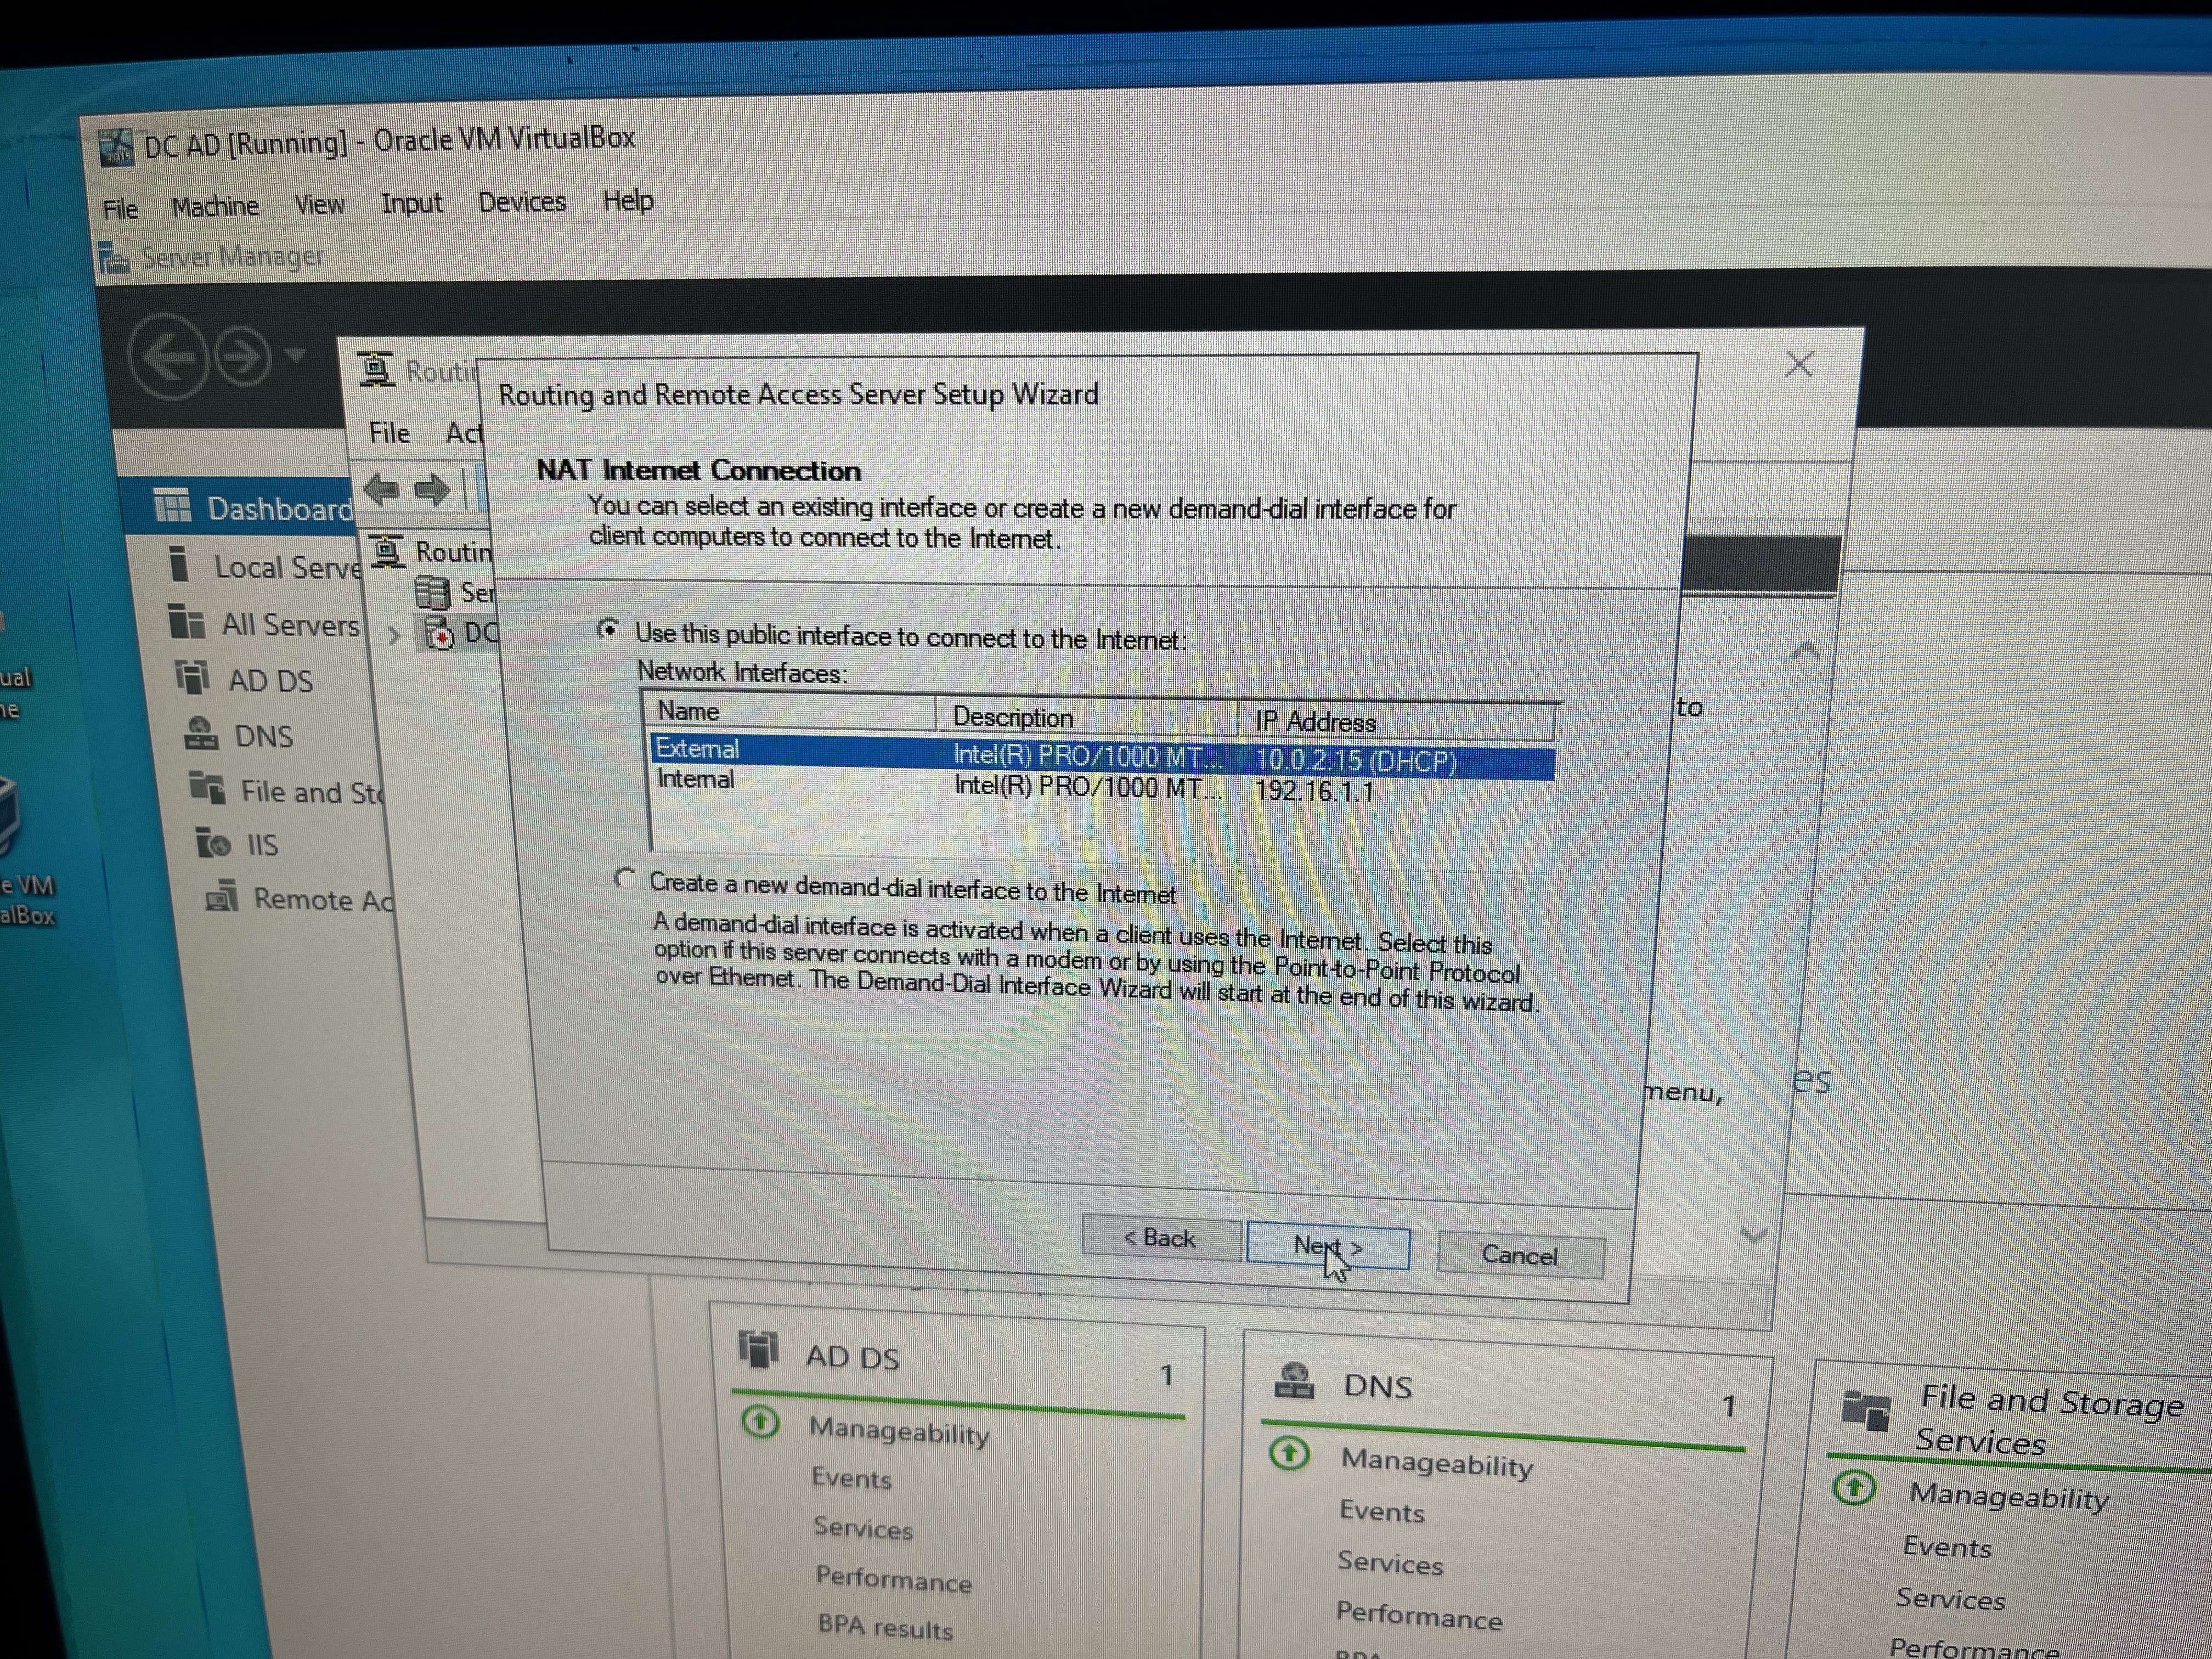
Click next, then select NAT and hit next.


The next step is to set up a DHCP server on our domain controller. (DHCP is in charge of distributing IP addresses)
Click on add roles and features, then click next until you see the check list, check DCHP server and add feature.

Click next through the pages until install again and click install. Once that is done, close out of the window and go up to tools again, and select DHCP.


You do not need to add exclusions, so after that just press next. Assign a lease duration, which doesn't matter too much for the lab so go with a few days. Then select "Yes I want to configure these options."


Click finish. The two IP addresses may still be red. Right click on the server and click authorize, then right click on it again and select refresh. They should be green now.

Go to configure this local server. Click on IE Enhanced Security Configuration and ensure both admins and users are off.

This makes things a little easier. Usually it's not a good idea to do that in a real environment, but this is just a lab.
Next we want to create a bunch of users using Josh Madakors scripts.
Open internet explorer and paste this link in the search bar https://www.youtube.com/
This will take you to youtube, but just select go to site, then a bar will pop up at the bottom of the page. Select save. You should see a zip file in folders.

Double click that file and then drag the only file you see to the desktop so you know where to find it. Then open the folder.

Go into names (There should be a bunch of random names.) and add yours to the top and save.


Before anything else, type in Set-ExecutionPolicy Unrestricted and hit enter. Then click yes to all.


Now if you go to Active Directory Users and Computers you should see a bunch of new users.
*Note: You might see errors, those are most likely duplicates.
*Note: You might see errors, those are most likely duplicates.
Next go to Active Directory Users and Computers and search for yourself, it is in the start menu under Windows Administrative Tools. Right click on mydomain.com, hit refresh, then right click again and choose find.


Basically everything on the server is set up at this point.
Next step is to create a Windows 10 VM to be a client. A little different from the video, with the download I used for Windows 10. I had to create an installation media.
I had to go to media creationtool22H2 (which was the file I downloaded for Windows 10), double click.


This takes a while to download. Once complete, press finish.
Go back to oracle and create a new VM for Windows 10. Same process as before. Click new, then give it a name. Next select your Windows 10 ISO for the ISO image. Be sure to check the box that says skip unattended installation. It wouldn't work until I checked that box. From there use the default settings to create. 2048 MB of RAM and 50 GB of disk space will probably be fine. Then click finish.
Before opening Windows 10 VM go to settings. Again under General, Advanced, change the Share Clipboard and Drag'n'Drop to Bidirectional. Then in Network switch Adapter 1 to Internal Network. Josh Matakor changes the number of CPUs in his video, but I just left mine at one.
Now, open your new Windows 10 VM. Select your language. Then click install now. When it says Activiate Windows just click I don't have a product key. Next ensure you select Windows 10 pro because home won't let you join the domain. Agree to the licenses and agreements. Then select Custom: Install Windows only (advanced) then click next. It will then take a minute to install windows. Once it's done, pick your region and keyboard setup.
Next set up for personal use. If it asks you to link to an account, select offline account, then limited experience. Give the user a name, like user to keep it simple. Next you can skip the password. Then select not now. Select no on all the options on the Choose privacy settings for your device page.

Then skip the options for use. Basically if they offer you anything or try to get you to sign up for an account with windows say no or skip.
Once the Windows 10 is set up open the command line (type cmd into the search bar to find it) and type in ipconfig then hit enter. This will check your connections. You should see the ip address for the default gateway and also an ip address within the range you assigned because it is connected to your DHCP server.
Once the Windows 10 is set up open the command line (type cmd into the search bar to find it) and type in ipconfig then hit enter. This will check your connections. You should see the ip address for the default gateway and also an ip address within the range you assigned because it is connected to your DHCP server.


Next you can check if it will ping the domain by typing ping www.mydomain.com and hit enter and you should be able to tell if it is connected (0% loss).


The computer will then restart.
Next go back to the domain server and go to DHCP (in server manager under tools). Click dcad.mydomain.com, then on IPv4, then address leases. You should see the new machine (and one bad address for me for some reason). The more clients you have, the more addresses would show up.
 Next go to start and select Windows Admin tools, then select Active Directory Users and Computers. Click Computers on the left hand side and you should see your new computer (Client1).


Back to the Windows 10 VM. When logging in next choose Other User, then you can choose any user from the list and type in the password and log on.

It will take a minute to set up the account, but once you are in, you basically simulated a corporate active directory.
Overall, this was a pretty simple and straight forward lab. I think the scripts provided by Josh made things a lot easier, or at least more interesting. Hopefully, I can use the knowledge and experience gained from the lab somewhere in my career.


Comments
Post a Comment